 Stampede Design
A little introduction; in one of our most recent Shopify customization projects involving a store selling Subaru vehicle parts, the client wanted to have a cascading dropdown list to filter the products displayed to the user based on the vehicle selected.
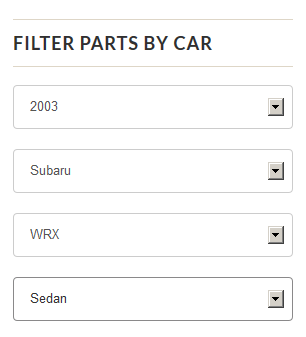
The requirement: Cascading dropdown list
This being on Shopify, the only way to code this custom feature is by getting creative with Javascript. It was then when I discovered about TaffyDB as the medium to store the 100+ odd rows of vehicle data. I played around with some hard-coded sample data using TaffyDB (and jQuery) and managed to get the cascading dropdown to work properly in Shopify. Perhaps the steps can be outlined in another blog post.
Now we move on to the main gist of this post. The client had the vehicle data populated nicely in Google Sheets. My next big task was to reformat these data to a TaffyDB-compatible data file. Below is a snapshot of the Google Sheet and the corresponding TaffyDB data, which is essentially a JS array of objects. The cool part is to automate this conversion process.

Sample data in Google Sheet (click to enlarge)
var car = TAFFY([
{year:"2002", make:"Subaru", model:"WRX", trim:"Sedan", bolt:"5x100", e_family:"EJ", e_code:"EJ20"},
{year:"2002", make:"Subaru", model:"WRX", trim:"Wagon", bolt:"5x100", e_family:"EJ", e_code:"EJ20"},
{year:"2003", make:"Subaru", model:"WRX", trim:"Sedan", bolt:"5x100", e_family:"EJ", e_code:"EJ20"},
{year:"2003", make:"Subaru", model:"WRX", trim:"Wagon", bolt:"5x100", e_family:"EJ", e_code:"EJ20"}
]);
Enter Google Apps Script. This tool is a godsend because it allows you to use Javascript to programmatically manipulate data in your spreadsheet. To access Google Apps Script in Google Sheets, go to Tools -> Script Editor.
After going through a few tutorials, I managed to come out with a fairly decent code for performing this conversion process.
/**
 * Retrieves all the rows in the active spreadsheet that contain data and generate a TaffyDB data array from it
 */
function readRows() {
  var sheet = SpreadsheetApp.openById('SPREADSHEET_ID_HERE').getActiveSheet();   // The value of key= variable in the URL

  // This represents ALL the data
  var range = sheet.getRange(5, 1, 1000, 20);   // Starts reading from row #5 column #1 (cell A5). Read as far as 1000 rows and 20 columns (for future data entries).
  var values = range.getValues();
  var output = '';
  var index = [];
  var row_array = [];
  var row = "";

  // The main loop that goes through each cell within the selected range. i is row, j is column
  for (var i in values) {
    var cell_array = [];
    for (var j in values[i]) {
      if(i == 0) {   // i == 0 is row #5, this is the column variable name
        if (values[i][j]) {
          index.push(values[i][j]);
        }
      } else {   // car data starts at row #7 onwards
        if (values[i][j]) {
          cell_array.push(index[j] + ':"' + values[i][j] + '"');   // compose the car data cell by cell for the current row
        }
      }

    }

    if(i > 0) {
     if(cell_array.length > 0) {
        row = cell_array.join(', ');   // join the individual cells car data for the current row with commas to form a complete row data
        row_array.push(row);
      }
    }

  }

  output = row_array.join('}, n{');   // join the individual rows with curly braces and commas to form a complete database

  output = 'var car = TAFFY([{' + output + '}]);';   // finalizing the TaffyDB format

  Logger.log(output);
  //return output;
};
To test this code out, simply enter your spreadsheet ID in line 5 and change the range number accordingly in line 8. The Logger.log command in line 44 is used for testing the output in the script editor console. In the production version, I have a few more extra codes to add a dropdown menu in the Google Sheets UI that users can click to download the updated TaffyDB JS data file and then simply drop it into Shopify.
